How to Prepare Garden Soil for Your Garden
Getting your garden off to a strong start begins beneath the surface with the soil. No matter what you plan to grow, whether it’s vegetables, flowers, or herbs, knowing how to prepare garden soil is the single most important step toward success. Healthy soil supports strong roots, retains moisture, resists disease, and delivers nutrients where they’re needed most.
In this guide, we’ll walk you through every essential step to prepare garden soil properly. You’ll learn how to assess your current soil, improve its structure, adjust pH levels, add organic matter, and set the stage for a productive growing season. Whether you’re starting from scratch or refreshing an existing bed, these techniques are tried, tested, and trusted by gardeners around the world.
Why Soil Preparation Matters
Soil is more than just dirt. It’s a living ecosystem teeming with microorganisms, fungi, earthworms, and beneficial bacteria—all working together to support plant life. When you prepare garden soil correctly, you’re not just moving earth around. You’re creating a balanced environment where plants can thrive.
Poorly prepared soil leads to stunted growth, nutrient deficiencies, water runoff, compaction, and increased vulnerability to pests and diseases. On the other hand, well-prepared soil promotes deep root development, efficient water use, and abundant harvests.
According to experts at the University of Wisconsin Extension, “Soil preparation is the foundation of successful vegetable gardening.” The Royal Horticultural Society echoes this sentiment, emphasizing that proper soil prep reduces long-term maintenance and increases yields.
Step 1: Assess Your Current Soil Condition
Before you dig in, take time to understand what you’re working with. Grab a handful of soil and examine its texture. Is it sandy and gritty? Sticky and dense like clay? Or crumbly and rich like chocolate cake?
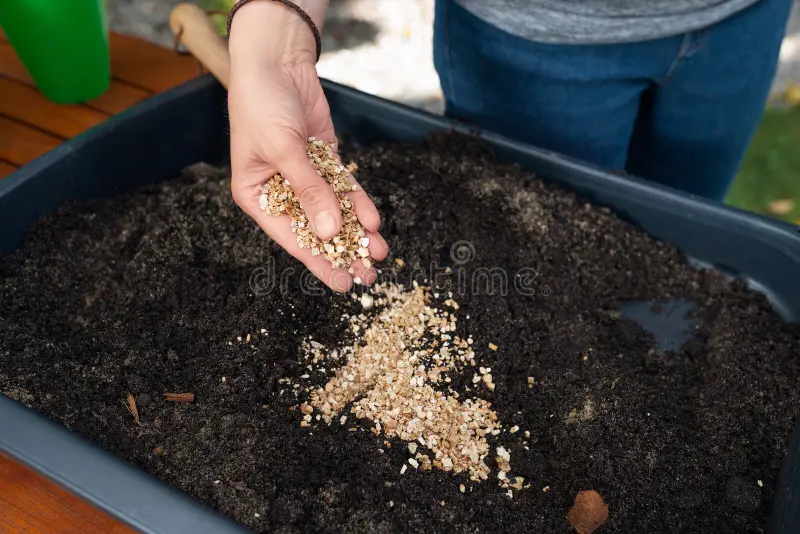
You can also perform a simple jar test: place a sample of your soil in a clear jar, fill it with water, shake vigorously, and let it settle overnight. The layers that form will show you the proportions of sand, silt, and clay—giving you insight into your soil type.
For even better accuracy, consider sending a sample to your local cooperative extension service for testing. They’ll provide detailed information on pH, nutrient levels, and recommendations for improvement.
Most plants prefer a slightly acidic to neutral pH between 6.0 and 7.0. If your soil falls outside this range, don’t worry—you can adjust it over time.
Step 2: Clear the Area and Remove Weeds
Start with a clean slate. Remove all weeds, grass, rocks, and debris from the area you plan to cultivate. Perennial weeds like dandelions or bindweed should be dug out completely, including their roots, to prevent regrowth.
If you’re converting lawn into garden space, you have two main options:
- Dig and remove sod manually, flipping it upside down to compost underneath.
- Use sheet mulching (also called lasagna gardening) by layering cardboard or newspaper over the grass, then topping it with compost and mulch. This smothers vegetation without tilling.
Avoid using chemical herbicides if possible, especially in food gardens. Manual removal or solarization (covering soil with clear plastic during hot months) are safer, more sustainable alternatives.
Step 3: Loosen and Aerate the Soil
Compacted soil restricts root growth and prevents water and air from penetrating. Use a garden fork or broadfork to gently loosen the top 8 to 12 inches of soil without turning it over completely. This method preserves soil structure and microbial life while still improving drainage and aeration.
Avoid rototilling unless absolutely necessary. While convenient, repeated tilling destroys soil aggregates, brings weed seeds to the surface, and disrupts beneficial organisms. Margaret Roach of A Way to Garden advises minimizing mechanical disturbance to protect the soil’s natural balance.
If your soil is extremely compacted or new to cultivation, one-time tilling may be helpful—but follow up immediately with organic amendments to rebuild structure.
Step 4: Add Organic Matter
This is where the magic happens. Adding organic matter is the single best thing you can do to prepare garden soil. Compost, aged manure, leaf mold, and cover crops all enrich the soil, improve texture, and feed microbes.
Aim to incorporate 2 to 4 inches of high-quality compost into the top 6 to 8 inches of soil. Mix it evenly but gently—avoid overworking the soil.
The Old Farmer’s Almanac recommends using homemade compost whenever possible, as it’s free, sustainable, and packed with local nutrients. If buying compost, choose products certified by the U.S. Composting Council to ensure quality and safety.
Other excellent sources of organic matter include:
- Well-rotted animal manures (cow, horse, chicken—never fresh)
- Worm castings
- Peat moss or coconut coir (for moisture retention)
- Green manures or cover crops like clover, vetch, or rye (planted off-season and turned under)
Organic matter helps sandy soils hold water and nutrients, while helping clay soils drain better and become easier to work.
Step 5: Test and Adjust Soil pH
As mentioned earlier, most plants thrive in soil with a pH between 6.0 and 7.0. Blueberries and azaleas prefer more acidic conditions (around 4.5–5.5), while brassicas like cabbage and broccoli do better in slightly alkaline soil (up to 7.5).
To raise pH (make soil less acidic), add garden lime. To lower pH (make soil more acidic), apply elemental sulfur or aluminum sulfate. Always follow package instructions and retest after a few weeks to monitor changes.
Never guess when adjusting pH—it’s easy to overcorrect and create new problems. Slow, measured adjustments yield the best results.
Step 6: Balance Nutrients
Even with great structure and pH, your soil may lack key nutrients. A soil test will tell you exactly what’s missing. Common deficiencies include nitrogen (N), phosphorus (P), and potassium (K)—the three numbers you see on fertilizer labels.
Instead of synthetic fertilizers, opt for slow-release organic options like:
- Blood meal (for nitrogen)
- Bone meal (for phosphorus)
- Greensand or kelp meal (for potassium and trace minerals)
Work these into the top few inches of soil before planting. Remember: more is not better. Over-fertilizing can harm plants and pollute groundwater.
Garden Design magazine suggests feeding the soil, not just the plants. Healthy soil biology naturally cycles nutrients, reducing the need for constant inputs.
Step 7: Create Raised Beds or Mounded Rows (Optional)
If your native soil is poor, poorly drained, or difficult to work, consider building raised beds. Filled with a custom soil mix, raised beds give you complete control over growing conditions.
A basic raised bed mix includes:
- 1/3 topsoil
- 1/3 compost
- 1/3 coarse sand or perlite (for drainage)
Alternatively, mounding soil into rows or hills improves drainage and warms faster in spring—ideal for crops like squash, cucumbers, or potatoes.
Raised beds also reduce bending and make maintenance easier, especially for gardeners with mobility challenges.
Step 8: Mulch and Protect Your Soil
Once your garden is planted, don’t leave the soil bare. Apply a 2 to 3 inch layer of organic mulch such as straw, shredded leaves, wood chips, or grass clippings.
Mulch conserves moisture, suppresses weeds, moderates soil temperature, and gradually breaks down to feed the soil. Just keep mulch a few inches away from plant stems to discourage rot and pests.
During the off-season, plant cover crops or spread a thick layer of compost to protect soil from erosion and nutrient loss. Bare soil is vulnerable soil.
Common Mistakes to Avoid When You Prepare Garden Soil
Even experienced gardeners sometimes cut corners. Here’s what to watch out for:
- Working wet soil: Tilling or digging when soil is soggy destroys its structure and causes compaction. Wait until it’s dry enough to crumble in your hand.
- Over-tilling: Destroys soil life and creates hardpan over time.
- Ignoring soil tests: Guessing nutrient needs wastes money and can damage plants.
- Using low-quality amendments: Cheap bagged topsoil or uncomposted manure can introduce weeds, pathogens, or imbalance nutrients.
- Skipping organic matter: No shortcut replaces the long-term benefits of compost and humus.
Seasonal Tips for Ongoing Soil Care
Preparing garden soil isn’t a one-time task. Think of it as an ongoing relationship.
- Spring: Lightly fork beds, add compost, check pH, and plant cover crops in empty spaces.
- Summer: Keep mulched, avoid walking on wet soil, side-dress heavy feeders with compost tea.
- Fall: Plant cover crops, add fallen leaves, and top-dress beds with compost before winter.
- Winter: Let the soil rest. Plan crop rotations and order soil test kits for spring.
The RHS recommends rotating crops annually to prevent nutrient depletion and break pest cycles. Pair heavy feeders (like tomatoes) with light feeders (like carrots) and follow with soil-building legumes (like beans or peas).
Tools You’ll Need to Prepare Garden Soil
Having the right tools makes the job easier and more effective:
- Garden fork or broadfork
- Spade or shovel
- Rake (both bow and landscape styles)
- Wheelbarrow or garden cart
- Soil testing kit or mail-in service
- Gloves and knee pads (your back and knees will thank you)
Invest in quality tools—they last longer and make repetitive tasks less taxing.
Final Thoughts
Learning how to prepare garden soil is an investment that pays dividends year after year. Healthy soil grows healthy plants. It reduces watering needs, minimizes pests and diseases, and maximizes flavor and nutrition in your harvest.
Take it slow. Observe how your soil responds. Keep records. Adjust as needed. Every season teaches you something new.
At GardenKT, we believe great gardening starts from the ground up. For more tips on building fertile beds and choosing the right amendments, explore our guide to choosing the best compost for your garden. And if you’re ready to test your soil, check out this trusted resource from University of Wisconsin Extension.
With patience and care, your soil will become your greatest ally in the garden.